
 Newsletter
Created by Orckestra
Newsletter Developer Guide
Writing Custom Mailing List Member Providers
The mailing lists in the Newsletter add-on are filled with members by mailing list member providers.
However, you are not limited to the sources existing within the Newsletter add-on or C1 CMS itself for member lists. You can create your own mailing list member providers to get their member lists from external sources such as databases and database-like files.
Default Mailing List Member Providers
The Newsletter add-on comes with two default providers:
- SubjectBasedMailingListProvider
- DataTypeBasedMailingListProvider
As it follows from their names, they handle subject-based and datatype-based mailing lists respectively.
Two corresponding assemblies contain the code for these providers:
- Composite.Community.Newsletter.DataTypeBased.dll
- Composite.Community.Newsletter.SubjectBased.dll
These assemblies are installed in the Bin folder of the C1 CMS-based website.
The providers are plugged in via the C1 CMS configuration file (\\<website>\Apps_Data\Composite\Composite.config) in the <Composite.Community.Newsletter.Plugins.MailingListProviderConfiguration> section:
<Composite.Community.Newsletter.Plugins.MailingListProviderConfiguration>
   <MailingListProviderPlugins>
      <add name="Composite.Community.Newsletter.SubjectBased" type="Composite.Community.Newsletter.SubjectBased.StandardPlugins.MailingListProvider.SubjectBasedMailingListProvider, Composite.Community.Newsletter.SubjectBased" />
      <add name="Composite.Community.Newsletter.DataTypeBased" type="Composite.Community.Newsletter.DataTypeBased.StandardPlugins.MailingListProvider.DataTypeBasedMailingListProvider, Composite.Community.Newsletter.DataTypeBased" />
   </MailingListProviderPlugins>
</Composite.Community.Newsletter.Plugins.MailingListProviderConfiguration>
Listing 1: Default providers plugged in
Each <add> element stands for one mailing list member provider and has two mandatory attributes:
- name
- type
The name attribute specifies the name of the mailing list member provider.
The type attribute specifies the name of the mailing list member provider class followed by the provider’s assembly separated by a comma.
In the default configuration, these values are as follows:
Name: Composite.Community.Newsletter.SubjectBased
Provider: Composite.Community.Newsletter.SubjectBased.StandardPlugins.MailingListProvider.SubjectBasedMailingListProvider
Assembly: Composite.Community.Newsletter.DataTypeBased
Name: Composite.Community.Newsletter.DataTypeBased
Provider: Composite.Community.Newsletter.SubjectBased.StandardPlugins.MailingListProvider.DataTypeBasedMailingListProvider
Assembly: Composite.Community.Newsletter.SubjectBased
The SubjectBasedMailingListProvider makes use of members manually added to the subject-based mailing lists. They are centrally stored in the built-in global datatype Composite.Community.Newsletter.SubjectBased.Member that comes with the Newsletter add-on.
The DataTypeBasedMailingListProvider gets its member list from any existing global datatype that has the Email field.
Custom Mailing List Member Providers
Using the plug-in model of the Newsletter add-on, you can create custom mailing list member providers and integrate them into the Newsletter add-on.
These providers get their member lists from external databases and database-like files, for example, a CRM system, an SQL database, an Excel spreadsheet or even a plain-text file (flat-file database).
Creating a custom provider means creating an assembly (similar to the default two), which implements the plug-in model-related classes and interfaces and plug it into the Newsletter.
The steps to create a custom mailing list member provider include:
- Creating a class library project and adding required references to it.
- Creating required classes by implementing the Newsletter plug-in model.
- Building and deploying the provider on the website.
In the following few sections, you will learn more about these steps.
For illustration, we will create a sample custom provider.
To simplify the sample code, instead of using 3rd-party application APIs to import member lists, we will use a flat-file database stored in the MailingList.txt file in the root folder of the target website.
The member list will only consist of one field, “Email”. Each email address will be kept in the MailingList.txt file on a new line.
Each custom mailing list provider is represented by a class library assembly. So you should start by creating a class library project by using a Class Library project template in Visual Studio 2008 (Visual C#, Windows, Class Library).
For our sample we will create the project called Composite.Community.Newsletter.FileBased
To be able to use C1 CMS, the Newsletter add-on and other functionality, you should add a number of references to the project.
Normally, you should add references to the assemblies located in the Bin folder of your website with the Newsletter add-on already installed.
The following references must be added to the project:
- Composite
- Composite.Community.Newsletter
- Composite.Generated
- Composite.Workflows
- ICSharpCode.SharpZipLib
- Microsoft.Practices.EnterpriseLibrary.Common
- Microsoft.Practices.EnterpriseLibrary.Configuration.Design
- Microsoft.Practices.EnterpriseLibrary.ExceptionHandling
- Microsoft.Practices.EnterpriseLibrary.Logging
- Microsoft.Practices.EnterpriseLibrary.Validation
- Microsoft.Practices.ObjectBuilder
- System.Configuration
- TidyNet
Once you have created a Class Library project and added all required references, go on to create a number of classes for your mailing list member provider.
To integrate your mailing list member provider into the Newsletter add-on, you should create 3 classes, which are implementation of two abstract classes available in Composite.Community.Newsletter and one interface available in Composite.Community.Newsletter.Plugins.MailingListProvider:
- Mailing List Definition Class
- Mailing List Member Class
- Mailing List Provider Class
In the following subsections, you will learn more about these abstract classes and interface and see the sample code that implements them.
Step 1: Create Mailing List Definition Class
First, you should create a class that will represent a custom mailing list, that is, a mailing list definition class. This class must supply the following information to the Newsletter code:
- GUID
- Title
- Description
- Flag to indicate whether members are culture-specific
- Entity token
The GUID uniquely identifies the mailing list in the Newsletter add-on.
The Title and Description are the GUI elements that the end user will identify the mailing list by.
The flag indicates whether the members are culture-specific. If true, different mailing list members can be available for each locale on C1 CMS. If false, the member list will be available only for the default locale.
The Entity token is used by the C1 CMS Security model to place elements in the tree structures such as those representing pages in the Content perspective.
You should create the mailing list definition class by inheriting it from the abstract MailingListDefinition class (Composite.Community.Newsletter.MailingListDefinition) and overriding its properties:
public abstract class MailingListDefinition
{
protected MailingListDefinition();
public abstract string Description { get; }
public Guid Id { get; protected set; }
public abstract EntityToken ListEntityToken { get; }
public abstract bool MembersAreCultureSpecific { get; }
public abstract string Title { get; }
}
Listing 2: Abstract MailingListDefinition class
In the following example, we have created the FileBasedMailingListDefinition class for our sample mailing list member provider:
using System;
using System.Collections.Generic;
using System.Linq;
using System.Text;
using Composite.Security;
using Composite.Community.Newsletter.ElementProvider;
namespace Composite.Community.Newsletter.FileBased.Plugins.MailingListProvider
{
   public class FileBasedMailingListDefinition : MailingListDefinition
   {
      private EntityToken _listEntityToken;
      public FileBasedMailingListDefinition(Guid id)
      {
         this.Id = id;
         this._listEntityToken = new MailingListEntityToken(id, "FlatFile");
      }
      public override string Description
      {
         get { return "File-based mailing list"; }
      }
      public override EntityToken ListEntityToken
      {
         get { return _listEntityToken; }
      }
      public override bool MembersAreCultureSpecific
      {
         get { return false; }
      }
      public override string Title
      {
         get { return "File-based mailing list"; }
      }
   }
}
Listing 3: Sample MailingListDefinition implementation
As you can see in the example above:
- In the constructor, we initialize the class’s ID property with the GUID passed to the constructor.
- We also create a new instance of the MailingListEntityToken class (Composite.Community.Newsletter.ElementProvider.MailingListEntityToken) and initialize the private ListEntityToken variable with it.
- Next, we provide the title and description with hard-coded strings.
- Then, we provide the EntityToken property we have initialized in Step 2.
- Finally, we indicate that the members of this list are not culture-specific.
Step 2: Create Mailing List Member Class
Now you should create a class that will represent a member of the custom mailing list. Each member can be of one or more types. Each type may include one or more fields. All these fields will be available to the user when he or she creates a newsletter. By using types you can combine sets of fields for a member object in your mailing list member provider.
The class you are about to create must be initialized with a string that contains an email address and supply a member as an object to the Newsletter code.
You should create the mailing list member class by inheriting it from the abstract MailingListMember class (Composite.Community.Newsletter.MailingListMember) and overriding its GetMemberObject method:
public abstract class MailingListMember
{
protected string _email;
public MailingListMember(string email);
public string Email { get; }
public virtual object GetMemberObject(Type type);
}
Listing 4: Abstract MailingListMember class
In the following example, we have created the FileBasedMailingListMember class for our sample mailing list member provider:
using System;
using System.Collections.Generic;
using System.Linq;
using System.Text;
namespace Composite.Community.Newsletter.FileBased.Plugins.MailingListProvider
{
   public class Member
   {
      public Member(string email)
      {
         this.Email = email;
      }
      public string Email { get; private set; }
   }
   public class FileBasedMailingListMember : MailingListMember
   {
      private Member _data = null;
      public FileBasedMailingListMember(string email) : base(email)
      {
         _data = new Member(email);
      }
      public override object GetMemberObject(Type type)
      {
         if (type == typeof(Member))
         {
            return _data;
         }
         throw new InvalidOperationException("Unknown type...");
      }
   }
}
Listing 5: Sample MailingListMember implementation
As you can see in the example above:
- First, we create a class called “Member”, which will serve as our member object type.
- Then in the FileBasedMailingListMember’s constructor we create a new Member object using the email address passed to the constructor and initialize the private Member variable using this object.
- In the GetMemberObject method, we return the Member object created in step 2 if the type passed to this method is of the Member type; otherwise, we throw an invalid operation exception indicating that the input parameter is of an unknown type.
Step 3: Create Mailing List Provider Class
Finally, you have to create a class that represents the mailing list provider.
The class should:
- Retrieve a list of member object types available in a specific mailing list
- Retrieve a list of mailing list definitions
- Retrieve a list of members in a specific mailing list (being able to limit the number of members to get and skip members until a specific email is found on the list)
- Build the unsubscribe link that will be inserted in newsletters
You should create a mailing list provider class by implementing the IMailingListProvider interface (Composite.Community.Newsletter.Plugins.MailingListProvider.IMailingListProvider):
public interface IMailingListProvider
{
string BuildUnsubscribePathAndQuery(string memberEmail, Guid mailingListId);
IEnumerable<Type> GetAvailableMemberObjectTypes(Guid mailingListId);
IEnumerable<MailingListDefinition> GetMailingListDefinitions();
IEnumerable<MailingListMember> GetMemberChunk(Guid mailingListId, int maxMembersToGet, string skipUntilEmail);
}
Listing 6: IMailingListProvider interface
In the following example, we have created the FileBasedMailingListProvider for our sample solution:
using System;
using System.Collections.Generic;
using System.Linq;
using System.Text;
using Microsoft.Practices.EnterpriseLibrary.Common.Configuration;
using Composite.Community.Newsletter.Plugins.MailingListProvider;
using Composite.IO;
using System.IO;
namespace Composite.Community.Newsletter.FileBased.Plugins.MailingListProvider
{
   [ConfigurationElementType(typeof(NonConfigurableMailingListProvider))]
   public sealed class FileBasedMailingListProvider : IMailingListProvider
   {
      public IEnumerable<Type> GetAvailableMemberObjectTypes(Guid mailingListId)
      {
         yield return typeof(Member);
      }
      public IEnumerable<MailingListDefinition> GetMailingListDefinitions()
      {
         yield return new FileBasedMailingListDefinition(new Guid("{E9A9A3CB-B338-4a5f-8D25-6C6CC2B8B9A8}"));
      }
      public IEnumerable<MailingListMember> GetMemberChunk(Guid mailingListId, int maxMembersToGet, string skipUntilEmail)
      {
         var memberlist = File.ReadAllLines(PathUtil.BaseDirectory + "Mailinglist.txt").Select(email => (MailingListMember)new FileBasedMailingListMember(email));
         if (string.IsNullOrEmpty(skipUntilEmail))
         {
            return memberlist.Take(maxMembersToGet);
         }
         return memberlist.SkipWhile(d => d.Email != skipUntilEmail).Skip(1).Take(maxMembersToGet);
      }
   }
}
Listing 7: Sample IMailingListProvider implementation
As you can see in the example above:
- For the member object types we return our type Member.
- For the mailing list definitions, we create and return our FileBasedMailingListDefiniton object.
- For the mailing list member objects, we read our file which serves as a flat-file database where members listed each on a new line and return this list after verifying a number of conditions against values passed to this method. The path to the file and its name are hard-coded as “MailingList.txt” in the root folder of the website.
Once you have finished creating all the required classes, you should proceed to build and deploy your mailing list member provider.
Once you have built your solution, you are ready to deploy it and use it on the website.
To deploy the solution, you can follow one of the two approaches:
- Automatic
- Manual
For automatic deployment, you should build an add-on for your mailing list member provider and then install it on your C1 CMS via its Packages system.
For manual deployment, you should copy the assembly you have just built to a specific folder on your website and plug it in via the C1 CMS configuration file.
For automatic deployment, you should build an add-on for your mailing list member provider following the standard add-on-building procedure.
In the Install.xsl file, you should specify the name of your custom provider, its class and its assembly.
The following is the sample for the FileBasedMailingListProvider we have created:
<xsl:stylesheet version="1.0" xmlns:xsl="http://www.w3.org/1999/XSL/Transform">
   <xsl:template match="@* | node()">
      <xsl:copy>
         <xsl:apply-templates select="@* | node()" />
      </xsl:copy>
   </xsl:template>
   <xsl:template match="/configuration/Composite.Community.Newsletter.Plugins.MailingListProviderConfiguration/MailingListProviderPlugins">
      <xsl:copy>
         <xsl:apply-templates select="@* | node()" />
         <xsl:if test="count(add[@name='Composite.Community.Newsletter.FileBased'])=0">
            <add name="Composite.Community.Newsletter.FileBased" type="Composite.Community.Newsletter.FileBased.Plugins.MailingListProvider.FileBasedMailingListProvider, Composite.Community.Newsletter.FileBased" />
         </xsl:if>
      </xsl:copy>
   </xsl:template>
</xsl:stylesheet>
Listing 8: Sample Install.xsl for FileBasedMailingListProvider
In the similar way, you should modify the Uninstall.xsl.
Once you have built the add-on, you can install it via the Packages system in the CMS Console (System > Packages > InstalledPackages > LocalPackages > Installlocalpackage).
To deploy the custom mailing list member provider manually:
- Copy the mailing list member provider assembly to the Bin subfolder in the root folder of your website.
- Open the C1 CMS configuration file found at \\<website>\App_Data\Composite\Composite.config
- Locate the <Composite.Community.Newsletter.Plugins.MailingListProviderConfiguration> section.
- Under the <MailingListProviderPlugins> element add the name of your provider, its class and its assembly.
The following is the sample for the FileBasedMailingListProvider we have created:
<add name="Composite.Community.Newsletter.FileBased" type="Composite.Community.Newsletter.FileBased.Plugins.MailingListProvider.FileBasedMailingListProvider, Composite.Community.Newsletter.FileBased" />
Listing 9: Sample of plugging in FileBasedMailingListProvider
- Now restart the server and then refresh the browser window (or tab) in which you have your CMS Console running.
Now that you have deployed the custom mailing list member provider, you can start using it.
Once you have deployed your custom mailing list member provider, it will appear in the Content perspective as another mailing list.
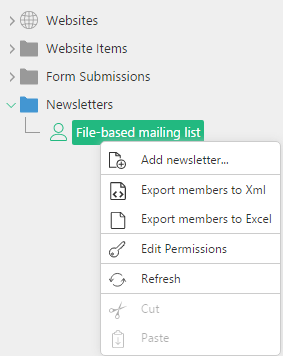
Figure 1: Custom file-based mailing list
This mailing list will use the list of members retrieved from your database or database-like file.
Since the member list is based on the external source, you cannot add or remove members from the list as you can do with the subject-based mailing list.
For the custom mailing list, you can create and send newsletters as well as export members if necessary.