 Azure Publisher - World Wide
Created by Orckestra
Azure Server Setup Guide
- Introduction
- Prerequisites
- Configuring the Website
- Deploying on Target Servers
- Deploying on Microsoft Azure
- Deploying on a Windows Server
- Down-Syncing Websites to Target Servers
Deploying on a Windows Server
When deploying a website on a Windows Server, you should normally install and start the Azure Blob Sync service, which serves here as a target server part, equivalent to the Azure server part deployed on Microsoft Azure.
Before you run the service, you need to make sure that there is a dedicated container for the deployment in the blob storage, and configure the service specifying the blob connection string and other parameters.
Preparing a deployment container
You should prepare a deployment container in the blob storage for your Windows Server deployment with the C1AzureBlobSync tool.
- Access your blob storage on Microsoft Azure:
- Create a "deployment" container within the blob storage where you have already uploaded your website.
To access the storage, you can use a tool of your choice (for example, CloudBerry Explorer for Azure Blob Storage) or access it directly on Microsoft Azure Portal.
Please note that since website has been uploaded to a dedicated "website" container, you need to use a different container for the deployment.
Before you install and start the C1AzureBlobSync service, you need to configure it.
- Locate and edit Composite.WindowsAzure.C1AzureBlobSync.Service.exe.config.
- Set the roleConfig parameter to the path to the role’s configuration file (role.config).
- Set the environmentConfig parameter respectively to the path to the environment’s configuration (env.config).
- Save the changes.
Please note that if these configuration files are in the same folder as the service configuration file, you can only specify their relative paths.
<configuration>
  <!-- skipped -->
  <appSettings>
    <add key="environmentConfig" value=" env.config" />
    <add key="roleConfig" value=" role.config" />
  <!-- skipped -->
  </appSettings>
<!-- skipped -->
</configuration>
Listing 4: Composite.WindowsAzure.C1AzureBlobSync.Service.exe.config
Now you need to configure the “role” and “environment” in corresponding files.
- Locate and edit role.config.
- Set the parameters with the following placeholders in the sample below:
- {DISPLAY_NAME}: The name to be used when referring to the website on a specific Windows Server.
- {DEPLOYMENT_NAME}: The name of your deployment. It must be the same as the name of the deployment container you've created earlier (see above).
- {ACCOUNT_NAME}: The name of the blob storage account used for the deployment.
- {KEY}: The primary access key for the blob storage account used for the deployment.
- Save the changes.
<ServiceConfiguration xmlns="http://schemas.microsoft.com/ServiceHosting/2008/10/ServiceConfiguration">
  <Role name="Composite.WindowsAzure.WebRole.SimpleBoot">
    <ConfigurationSettings>
      <Setting name="Composite.WindowsAzure.WebRole.DisplayName" value="{DISPLAY_NAME}" />
      <Setting name="Composite.WindowsAzure.WebRole.DeploymentName" value="{DEPLOYMENT_NAME}" />
      <Setting name="Composite.WindowsAzure.WebRole.Storage.ConnectionString"
               value="DefaultEndpointsProtocol=https;AccountName={ACCOUNT_NAME};AccountKey={ACCOUNT_KEY}" />
      <Setting name="Composite.WindowsAzure.WebRole.Iis.AppPoolIdleTimeoutMinutes" value="60" />
      <Setting name="Composite.WindowsAzure.WebRole.Manager.SleepTimerInMilliSeconds" value="5000" />
      <Setting name="Composite.WindowsAzure.WebRole.Manager.RollingUpdate" value="true" />
      <Setting name="Composite.WindowsAzure.WebRole.Manager.RollingUpdateIntervalInSeconds" value="30" />
      <!-- Maximum supported value is 60 -->
    </ConfigurationSettings>
    <Certificates></Certificates>
  </Role>
</ServiceConfiguration>
Listing 5: role.config
For more information on the role configuration parameters, please see "Role Configuration" for more information on this configuration.
- Locate and edit env.config.
- Set the parameters with the following placeholders in the sample below:
- {DEPLOYMENT_ID}
- {INSTANCE_ID}
- {INSTANCE_NAME}
- Save the changes.
<Settings>
  <add name="Environment.IsThisTheLowestInstance" value="true" />
  <add name="Environment.NumberOfInstances" value="1" />
  <add name="Environment.DeploymentId" value="{DEPLOYMENT_ID}" />
  <add name="Environment.RoleInstanceId" value="{INSTANCE_ID}" />
  <add name="Environment.RoleInstanceName" value="{INSTANCE_NAME}" />
  <add name="Environment.WebsitesPath" value="c:\www" />
  <add name="Environment.RootPath" value="c:\AzureBlobSync" />
  <add name="Composite.WindowsAzure.WebRole.Iis.DeleteDefaultSites" value="false" />
  <add name="Composite.WindowsAzure.WebRole.Iis.ManageIisConfiguration" value="true" />
  <add name="Composite.WindowsAzure.WebRole.SmtpServer.Install" value="true" />
</Settings>
Listing 6: env.config
The parameters you are supposed to set above are used internally but should be unique:
The deployment ID should be unique for the deployment and the role instance’s ID and name – unique for a single role within this deployment, which makes more sense in the scaled-out deployment.
By default, the tool would clear all the websites from the IIS before setting up a new one. When deploying locally, it is important to turn off this setting ('false'):
<add name="Composite.WindowsAzure.WebRole.Iis.DeleteDefaultSites" value="false" />
You can change other parameters, too. For more information on the environment configuration parameters, please see "Environment Configuration."
Running Azure Blob Sync as a service
The C1AzureBlobSync tool comes as a Windows executable, which you need to install as a Windows service on the Windows Server and then start it as a service.
- Locate and run install.bat, which installs the C1AzureBlobSync tool as a Windows service locally.
- Invoke the "Run" box (Win + R), type in "services.msc” and press “Enter” to run “services.msc”.
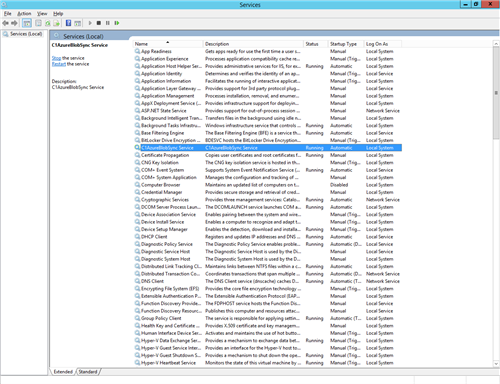
- In the “Services” window, locate and run the “C1AzureBlobSync” service.
Figure 18: C1AzureBlobSync service started
The C1AzureBlobSync service will be monitoring the “websites” and “deployment” container in the Azure blob storage for changes and down-sync the changes to the server or re-configure the deployment on the server accordingly.
Scaling out on Windows Servers
To scale out the deployment, you need to configure and run the service on each Windows Server (node):
- Configure the service making additional changes to the configuration as described below.
- Install and run the service on each new node.
On the first (”master”) node:
- Edit the env.config and set the Environment.NumberOfInstances parameter set to the number of instances (nodes) in your scaled-out deployment.
- Run “services.msc” and restart the “C1AzureBlobSync” service.
On the second (”slave”) and any other nodes withing the deployment:
- Edit env.
- In addition to the required settings, make sure to set these parameters:
- Environment.IsThisTheLowestInstance: Set to “false”
- Environment.NumberOfInstances: Set to the number of instances (nodes)
- Environment.RoleInstanceId: Set to the unique ID (for example, ”2”)
- Environment.RoleInstanceName: Set to the unique name (for example, ”Role2”)
- Install and run the ”C1AzureBlobSync” service.
<Settings>
  <add name="Environment.IsThisTheLowestInstance" value="false" />
  <add name="Environment.NumberOfInstances" value="3" />
  <add name="Environment.DeploymentId" value="deployment1" />
  <add name="Environment.RoleInstanceId" value="2" />
  <add name="Environment.RoleInstanceName" value="Role2" />
  <add name="Environment.WebsitesPath" value="c:\www" />
  <add name="Environment.RootPath" value="c:\AzureBlobSync" />
  <add name="Composite.WindowsAzure.WebRole.Iis.DeleteDefaultSites" value="false" />
  <add name="Composite.WindowsAzure.WebRole.Iis.ManageIisConfiguration" value="true" />
  <add name="Composite.WindowsAzure.WebRole.SmtpServer.Install" value="true" />
</Settings>
Listing 7: env.config for a “slave” node in the scaled-out deployment on Windows Servers


