 SQL Azure Scale-Out
Created by Orckestra
SQL Azure Scale-Out Setup Guide
- Introduction
- Pre-Installation and Installation Steps
- Configuring Media File Synchronization
- Configuring Data Change Synchronization
- Verifying the Correct Configuration of Synchronization
Configuring Data Change Synchronization
To configure synchronization of data changes, you should:
- Create a service bus on Microsoft Azure (if needed)
- Get the connection string for the service bus
- Specify the service bus connection string in Web.config
- Configure the data provider in Web.config
Creating a service bus on Microsoft Azure
To create a service bus on Microsoft Azure:
- Log into the Microsoft Azure management portal.
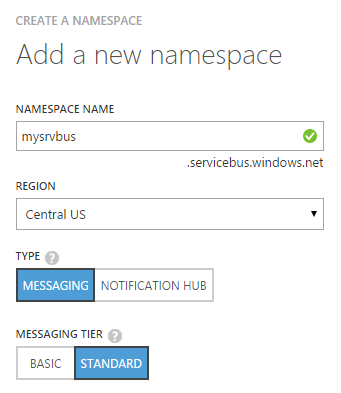
- Create a service bus.
- Make sure that the "Messaging Tier" parameter is set to "Standard" (not "Basic")
Figure 6: Creating a service bus on Microsoft Azure
Please note that when adding a service bus, the "Messaging Tier" parameter must be set to "Standard" (not "Basic") because the add-on is using the “Topics” feature of the Service Bus.
Getting the connection string for the service bus
- In the Microsoft Azure management portal, select the service bus.
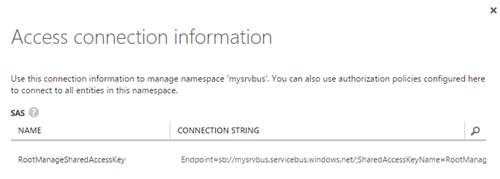
- Click “Connection Information”.
- Make a note of, or copy, the service bus connection string.
Figure 7: Getting the service bus connection string on Microsoft Azure
Please note that there are two types of service bus connection strings: SAS and ACS. You can use either.
Specifying the service bus connection string in Web.config
When being installed, the add-on adds two application settings to Web.config.
<configuration>
  <!-- skipped -->
  <appSettings>
     <add key="Composite.Azure.ScaleOut.DataCacheFlusher.ServiceBus.ConnectionString"
value="Endpoint=sb://[yourServiceNamespace].servicebus.windows.net/;SharedSecretIssuer=[issuerName];SharedSecretValue=[yourDefaultKey]" />
     <add key="Composite.Azure.ScaleOut.DataCacheFlusher.DataProviders"
value="DynamicSqlDataProvider" />
   </appSettings>
   <!-- skipped -->
</configuration>
Listing 4: Specifying the service bus connection string in Web.config
To specify the service bus connection string:
- Edit ~/Web.config.
- Set the service bus connection string in the "Composite.Azure.ScaleOut.DataCacheFlusher.ServiceBus.ConnectionString" setting. For example:
<add key="Composite.Azure.ScaleOut.DataCacheFlusher.ServiceBus.ConnectionString" value="Endpoint=sb://mysrvbus.servicebus.windows.net/;SharedAccessKeyName=RootManageSharedAccessKey;SharedAccessKey=gkTvceSqsUAx+okXzOG8WKCOJ9MflR/cx0ZBwyA0QW0=" />
Listing 5: Example of the service bus connection string specified in Web.config
Configuring the data provider in Web.config
As you are using the default SQL data provider named "DynamicSqlDataProvider", you don’t need to make any changes to the settings added by the add-on in Web.config.
- Therefore, keep the "Composite.Azure.ScaleOut.DataCacheFlusher.DataProviders" setting unchanged in Web.config.
<add key="Composite.Azure.ScaleOut.DataCacheFlusher.DataProviders"
value="DynamicSqlDataProvider" />
Listing 6: The data provider configured by default in Web.config
In general, the "Composite.Azure.ScaleOut.DataCacheFlusher.DataProviders" setting contains a comma separated list of data providers for which the cache flush notification should be enabled. By default, on an SQL-based C1 CMS website, the SQL data provider named "DynamicSqlDataProvider" is used. That's why normally this setting should be kept unchanged.


