
 Azure Publisher - Single
Created by Orckestra
Azure Publisher User Guide
Publishing with Azure Publisher
We assume that Azure Publisher is configured and can be used immediately. (For information about configuring Azure Publisher, please see the “Azure Publisher Setup Guide”.)
When you publish your staging website for the first time, it may take a few minutes because the entire website will be pushed to a blob storage on Microsoft Azure. (It also depends on how many publish profiles you have.)
Next time you publish, only changes will be published, and it will thus take significantly shorter time.
The changes can be "anything" in the website folder, including new assemblies, CSS, data schemas, content etc. Temporary or cached files are normally not pushed.
To publish changes to the blob storage:
- Log in to the CMS Console.
- In the Content perspective, select the Azure Publisher node.
- Click Open Publisher on the toolbar to open the Azure Publisher view.
Figure 2: Azure Publisher view
- In the view, click Publish.
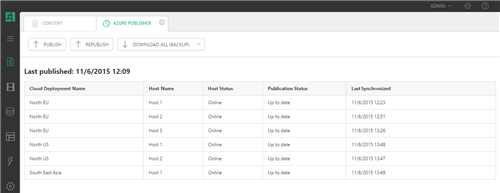
The synchronization will start and you will be able to see the progress of the file upload to the blob storage.

Figure 3: Uploading changed files to the blob storage (primary profile)
It will make as may uploads as many publishing profiles are configured. (Azure Publisher comes with 1 primary and 2 backup profiles.)
Once the files are uploaded, you will be also able to track the synchronization progress from the blob storage (the primary profile only) to target servers and the status for each server.
If you want to republish your entire staging website rather than synchronize changes only:
- Click Republish.
The process will be the same as that of publishing changes but might take longer and will depend on the website’s size because the entire website is being pushed to the blob storage.
For testing purposes, you can publish your staging website or changes on it to a test blob storage account on Microsoft Azure rather than the one used for a production site.
By default, you don’t have this option in the Azure Publisher view. To make it available, you should configure Azure Publisher for the test account, too. Please see the “Azure Publisher Setup Guide” (“Configuring a test site”) for these configuration steps.
If the test website is configured, a new button (“Publish to Test”) will appear in the Azure Publisher view. Click it to publish changes on your staging website to a test blob storage.

Figure 4: The Publish to Test feature