 Extranet Basic
Created by Orckestra
Extranet User Guide
- Introduction
- Creating and Managing Users and Groups
- Setting Security on Pages and Files
- Setting Up Optional Functionality
- Test Your Knowledge
Introduction
An extranet is a private network that uses the Internet to securely share a company’s internal information or resources with its customers, partners and other users. It is an effective way of doing business with a selected set of other companies without exposing private or sensitive information to general public access.
The Extranet add-on securely protects your websites that run on C1 CMS by allowing only registered users to view your website’s content and access its resources such as media files not available to the general public.
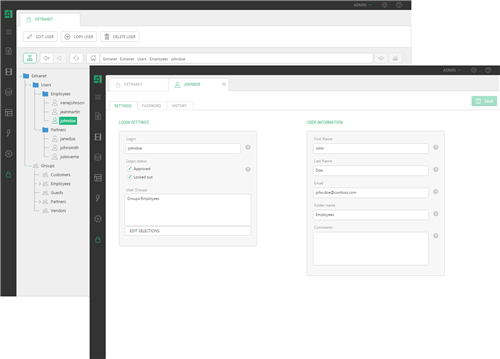
The user-friendly administrative tools for managing users, groups and security are directly integrated into the CMS Console.
Figure 1: Extranet
If you want your website visitors to log on to, and log off from your website, you can easily add these possibilities to your website using a number of Razor-based and easy-to-redesign functions.
It is also possible to provide a public registration on your website via the signup form available in the add-on. Besides, you can allow your registered users to manage their passwords if they forget or want to change them.
This guide is aimed at website administrators who will manage access to websites, web pages and other online resources.
We assume that you know how to work with the Content and Layout perspectives of C1 CMS. We also assume that you have an idea of what extranet is.
As a website administrator, you will primarily work within the Extranet perspective, a new perspective that appears in the Navigation pane once the add-on is installed.
To add the Registration and Login Status forms to your website, you will also need to know how to add functions to web pages and templates and have access to the Content and Layout perspectives to modify web pages and templates.
To get started with the Extranet add-on, you are supposed to take a number of steps.
Getting Started | ||
Step | Activity | Chapter or section |
1 | Install the Extranet add-on. | |
3 | Create users | |
3 | Create groups | |
4 | Assign users to groups | |
5 | Set up the login page | |
6 | Set up the login status on pages | |
7 | Activate the extranet security on the website | |
8 | Protect websites, web pages, media files | |
In the following few chapters, you will learn more about these and other activities.
The following is the list of terms and their definitions used throughout this guide.
Terms and Definitions | |
Term | Definition |
Extranet | A private network that uses the Internet to securely share a company’s internal information or resources with its external users. |
Extranet user | A person who uses extranet and has an extranet account. Identified by a user name and authenticated with a password. |
User group | A group of extranet users who have the same permissions within the extranet. |
Extranet security | Protection of website resources such as pages and media files with extranet facilities from non-authorized access. |
Login page | A dedicated page on a website where extranet users can log in to the extranet and, as a result, access extranet-protected resources. |
Login status | Indication of whether the current user is logged in to the extranet and, if so, what user account is used. |
- The e-mail functionality of the Extranet add-on uses an SMTP Server on the local host (server) by default. You can change this behavior by editing ~/web.config and include the /configuration/system.net/mailSettings section. For information about configuring the e-mail host in web.config, please refer to http://docs.c1.orckestra.com/ConfiguringEmailHost


