
 Extranet Basic
Created by Orckestra
Extranet User Guide
- Introduction
- Creating and Managing Users and Groups
- Setting Security on Pages and Files
- Setting Up Optional Functionality
- Test Your Knowledge
Setting Security on Pages and Files
Once you have defined what users can access your website resources, it is time to define what exactly they can access.
First, you need to create a web page where users will log in to your extranet-protected website. Then, you should add the login status information to web pages. Next, you have to activate the extranet security on your website. Finally, you should select which pages and media files to protect or protect the entire website.
Optionally, you can add possibilities for your website visitors to register in your extranet directly from your website. All the registered users may be allowed to change their passwords or get reminded of their passwords via email.
All the extranet users should first log in to access the pages and media files protected with extranet security. Therefore, you should set up a login page on your website. This page is always available to the general public access.
On this page, users will enter their credentials and by clicking the Log In button they will log in to your extranet and thus get access to all extranet-protected resources.
You set up a login page by adding the Login form to an existing or new web page.
To set up a login page:
- In the Content perspective, under your website's homepage, add a new page, for example, “Login”.
- Add the Composite.Community.Extranet.LoginForm function to the page.
- If necessary, set the optional parameters:
- Signup Page: When specified, a link to the signup page is shown on the form.
- Password Recovery Page: When specified, a link to the password recovery page is shown on the form.
- Login Success Page: When specified, this page will be shown to the user who has successfully logged in.
- Save and publish the page.
- Click the Preview tab.
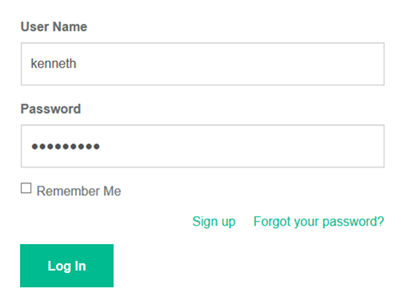
Figure 12: Login Form
The form has two fields: User Name and Password where the user enters his or her credentials and clicks the Log In button.
Now that you have set up a login page, go on to set up login status information on the existing pages.
Setting Up Login Status on Existing Pages
To keep users aware of their login status (logged in or logged off), you should add the status information on the extranet-protected pages.
The “iconified” version of the login status uses a graphic representation of the status:
- Locked (
): logged off
- Unlocked (
): logged in
This feature also allows the users to log off directly from the page they are currently viewing.
To set up login status on web pages:
- In the Layout perspective, open to edit a template used for the pages you intend to protect with extranet security.
- Add the Composite.Community.Extranet.LoginStatus function to the template.
- If necessary, set the optional parameter:
- Iconified: When checked (this is default), it shows the lock/unlock icon buttons and a dropdown login information.
- Save the template.
If the user is logged in to your extranet, she or he will see her or his login status on each page as well as be able to log off by clicking the “lock” button and then the “Click here to log out” link in the drop down menu.
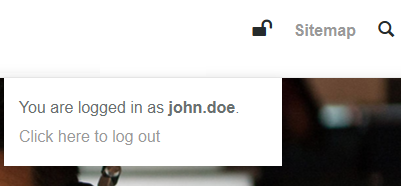
Figure 13: Login status at the top of the page
Once you have your login page and login status set up, proceed to the next step – activating the extranet security on your website.
After you have set up a login page and login status, you need to activate extranet security on your website.
To activate extranet security on a website:
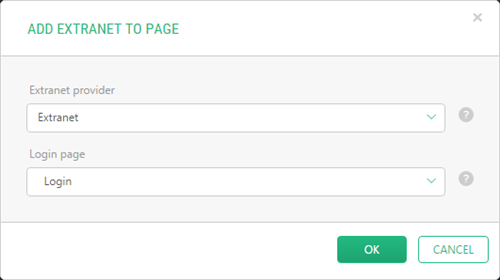
- In the Content perspective, right-click your website homepage and in the context menu, click Add extranet security.
- Then in the Add Extranet to Page dialog, select the Extranet provider (i.e. your Extranet) and the Login page you have created in one of the previous steps.
Figure 14: Activating extranet security
- Click OK.
Now each page of your website will have an additional command – Edit Extranet Security – available in the page’s context menu.
Now you can use this command to protect individual web pages or the entire website.
To remove extranet security from your website:
- In the Content perspective, right-click the homepage of your website and click Remove extranet security in the context menu.
- Click OK in the confirmation dialog.
Now all the extranet security has been removed from your website and all the pages are available to the general public access.
You can set up extranet protection for individual web pages. You protect a web page by editing its extranet security and assigning an extranet user group to it. You can assign more than one user group to the page.
All the subpages that this page has will inherit its extranet security.
Once the group is assigned to a page, all the approved users within this group will be able to access the page after having successfully logged in to the extranet.
To protect a page (and all its subpages):
- In the Content perspective, right-click the page and click Edit extranet security in the context menu. The page’s extranet security settings form opens in the right pane.
If this page is a subpage, all the groups inherited from its parent page will be listed in the Inherited Groups list. Otherwise, the New Groups list will be only available.
The Inherited Groups list is not editable.
Figure 15: Protecting a web page
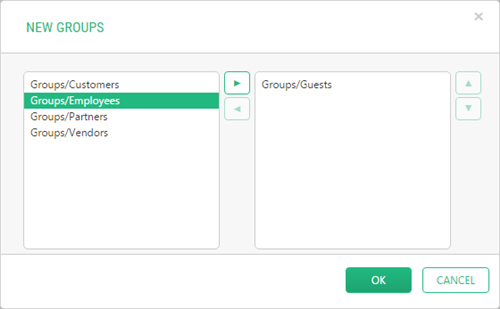
- Click Edit Selections for the New Groups list. The New Groups dialog opens.
- In this dialog, select groups to be granted access to this page.
Figure 16: Selecting extranet groups to access the web page
- Click OK and save the changes.
You can secure all the pages on your website by assigning the extranet user groups to the homepage of your website. Because all sub pages will inherit the extranet security settings of its parent page, you can thus protect the entire website.
The steps for protecting the entire website are the same as the steps for protecting individual pages. This time you should only edit the extranet security for the homepage.
To give access to you website to all the approved users regardless the group they belong to, please consider the following section - Granting Access to All Authenticated Users.
Granting Access to All Authenticated Users
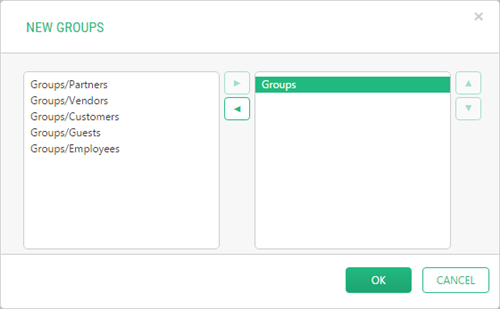
You can grant access to all the approved users regardless of the group they belong to by selecting the root extranet Groups group, instead of a specific group.
First, you need to make the Groups group available for selection when editing the extranet security on a page. By default, the Groups group is unavailable for selection.
Then, you need to select it for a page’s extranet security instead of specific groups.
To grant access to all authenticated users:
- In the Extranet perspective, click Groups and click Edit Group on the toolbar. The Groups settings form opens in the right pane.
- On the Advanced tab, check the Can be assigned access rights option.
- Click Save. Now the Groups (with all its subgroups) will be available for extranet security in the Content perspective.
- In the Content perspective, right-click a page or your website's homepage and click Edit extranet security in its context menu.
- In the right pane, click Edit Selections and in the New Groups dialog that appears, select Groups. All subgroups will be thus allowed access to the page or website.
Figure 17: Granting access to all the extranet groups
- Click OK and save the changes.
This will require that users should log in to the website and be a member of at least one group. Non-authenticated users will be redirected to the Login page.
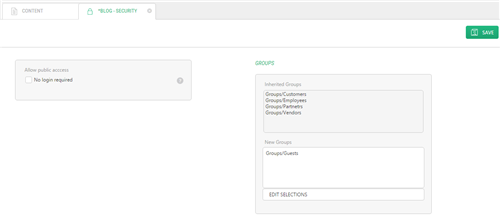
Allowing Public Access to Protected Pages Selectively
You can allow anyone access to a specific protected page regardless of inherited or specified group restrictions:
- Right-click a page you want to give public access to and click Edit extranet security.
- In the page security view that opens, check the "No login required" option.
- Click Save.
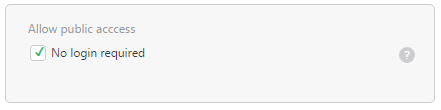
Figure 18: Allowing public access to a specific page
Even though the page should be protected, anyone can access it on the website now
Once you have protected pages on your website, you can also protect your media files.
The steps for protecting media files are similar to the steps of protecting web pages. First, you need to activate extranet security on your media folder. Then, you should assign user groups to access individual media files or the entire media folder.
To protect files in your media library:
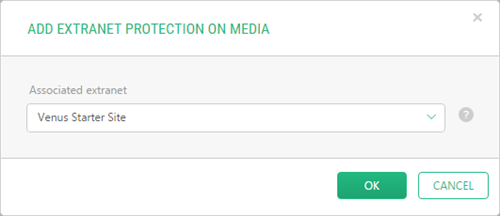
- In the Media perspective, locate the folder you want to protect, right-click it and click Add extranet protection in the context menu. The Add Extranet Protection on Media dialog appears.
- In the dialog, select your Associated extranet from the drop-down list. It bears the name of your website (homepage).
Figure 19: Activating extranet protection on media files
- Click OK.
- In the right pane, click Edit Selections and in the New Groups dialog, select the groups to be allowed access to this folder – in the same manner you did it with websites.
- Click OK and save the changes.
Alternatively, instead of Steps 4 and 5, you can edit extranet security of, and assign extranet user groups to, each file in the folder individually.
Getting Overview of Protected Website Resources
As you assign groups to a website, pages and media folders and files, you need to keep track of what resources a specific group has access to.
The Extranet add-on provides you with this overview via its View Secured Elements functionality.
To have an overview of a group’s access scope:
- In the Extranet perspective, click a group you want an overview of and click View Secured Elements on the toolbar.
- In the right pane, on the Content tab, you can view what websites and web pages this group has access to. On the Media tab, you can view what media folders and files this group has access to.
Either or both tabs can be unavailable, if the group has no access set up yet in the Content or Media perspectives.
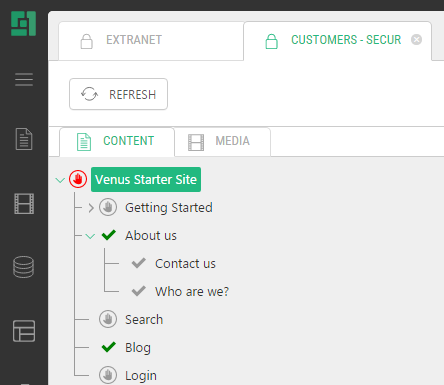
Figure 20: Overview of secured website resources
A dedicated icon indicates the access status of each element (see the legend below):
Legend | |
Graphic Representation | Access Status |
The group has access to the resource | |
The group has access to the resource (inherited from the parent resource) | |
The group has no access to the resource | |
The group has no access to the resource (inherited from the parent resource) | |


