
 Form Builder
Created by Orckestra
Form Builder Developer Guide
- Introduction
- Localizing the front-end
- Working with styling
- Changing the HTML or behavior of existing fields
- How to create a new field type
- How to create a new submit handler
- How to create a new security handler
- How to localize the admin UI
- The configuration file
How to create a new submit handler
By default, when the user submits a form, the submitted data are saved in an XML file.
This is handled by a submit handler “SaveToFile” hooked in to the submit event and enabled out-of-the-box. Another submit handler you can enable in a form is “SendEmail” that sends the submitted data to a specified email address.
Each submit handler is a Razor function in the “Composite.Forms.FormBuilder.Handler” namespace. Normally, these functions make use of the FormBuilder’s GetFormData method to access the data submitted via the form.
Each submit handler must be registered in the Composite.Forms.FormBuilder.xml configuration file to appear in the Form Builder on the Submit Action tab and enabled on this tab to execute on the submit event.
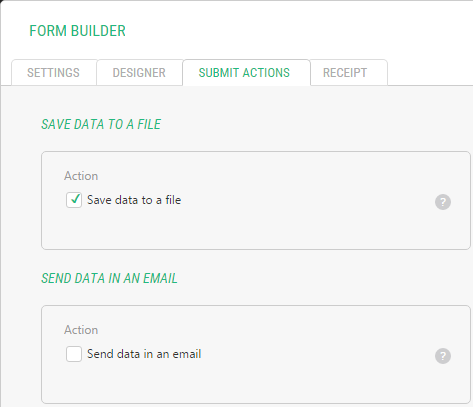
Figure 5: Default submit actions
Creating a custom submit handler
To create a Razor function that will serve as a submit handler:
- From the “Functions” perspective, add a new Razor function using, for example, “Composite.Forms.FormBuilder.Handler” for its namespace. Alternatively, you can create a Razor function in Visual Studio 2012. (Please see “Creating Razor Functions in Visual Studio”).
- Add necessary code and markup. To access the submitted data use the Composite.Forms.FormBuilder.FormHelper.GetFormData method
- Save the function.
For illustration, you can check “SaveToFile”, “SendEmail” and “ListValues” functions or the sample that follows this section.
To register the submit handler in the FormBuilder’s configuration file:
- Edit ~/App_Data/Composite/Configuration/Composite.Forms.FormBuilder.xml.
- Within the <Actions/> element, add a new <Action/> element.
- Set its attributes such as name, label and help.
- Within this <Action/> element, specify the function created earlier.
- Save the file.
To enable the submit handler on the form:
- Edit the form you want to enable another submit action on.
- On the “Submit Actions” tab, select the respective action.
- Fill the related fields if necessary. (Enabling some actions may display additional fields to fill.)
- Save the form.
A custom submit handler sample
In the following example, we’ll created a submit handler that will save the submitted data in the CSV (comma-separated values) file and register it in the FormBuilder’s configuration file.
- From the “Functions” perspective, add a new Razor function named “Composite.Forms.FormBuilder.Handler.SaveAsCsv”.
- Replace the content with the code below.
- Save the function.
@inherits RazorFunction
@using Composite.Forms.FormBuilder
@functions {
    public override string FunctionDescription
    {
        get  { return "Saves submitted values into the specified data type."; }
    }
}
@{
    // get form data
    var formData = FormHelper.GetFormData();
    if (formData == null)
    {
        return;
    }
    // ensure a valid path to the CSV file
    string dirPath = HttpContext.Current.Server.MapPath("~/App_Data/FormData");
    if (!Directory.Exists(dirPath))
    {
        Directory.CreateDirectory(dirPath);
    }
    string filePath = Path.Combine(dirPath, formData.FormName + ".csv");
    // add the CVS header on the first submit
    string csvData = string.Empty;
    if (!File.Exists(filePath))
    {
        csvData +=  string.Format("{0}\r\n", string.Join(",", formData.Fields.Select(d=>d.Label)));
    }
    // add the form data
    csvData += string.Format("{0}\r\n", string.Join(",", formData.Fields.Select(d => d.Value)));
    // save the data to the CSV file
    StreamWriter file = new StreamWriter(filePath, true);
    file.Write(csvData);
    file.Close();
}
Listing 5: Custom submit handler as a Razor function
In the above sample, we:
- Get the form data with the GetFormData method
- Build a path to the file from the pre-defined directory and the from name as the filename
- Add the header if this is the first submit
- Add the form data
- Save the resulting string to the CSV file
Now that we created a custom submit handler, we need to register it in the Form Builder’s configuration file:
- Edit ~/App_Data/Composite/Configuration/Composite.Forms.FormBuilder.xml.
- Following the latest <Action/> element, add the markup below.
- Save the file.
  <Actions>
   <!-- other Action elements -->
    <Action name="SaveAsCsv" label="Save as CSV" help="Saves form data to a CSV file">
      <f:function name="Composite.Forms.FormBuilder.Handlers.SaveAsCsv">
      </f:function>
    </Action>
  </Actions>
Listing 6: Custom submit handler registered in the configuration
Finally, you should enable the new submit handler on your form.
- Edit the form you want to enable the “Save as CSV” submit action on.
- On the “Submit Actions” tab, select the “Save as CSV”.
- Save the form.
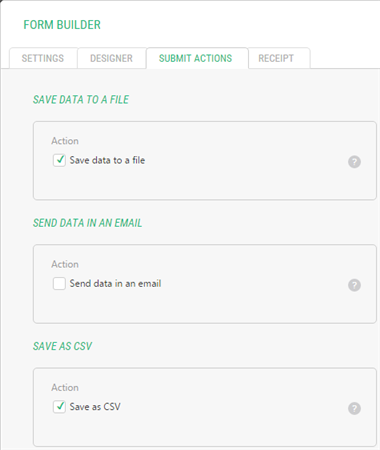
Figure 6: Custom submit action in the Form Builder
When the user submits the form, the submitted data will be now added to a CSV file (named after the form) at ~/App_Data/FormData.