
 Form Builder
Created by Orckestra
Form Builder User Guide
- Introduction
- Inserting New Forms
- Editing Forms
- Adding Fields to Forms
- Editing Field Properties
- Viewing submitted data
- Receiving Submitted Data by Email
- Test Your Knowledge
Receiving Submitted Data by Email
In addition to saving data to a file, you can also configure the form to send the submitted data by email.
Before you set up data submission by email, make sure you’ve configured the mail host on your website. For more information, please see “Email Host Setup”.
To configure data submission by email:
- Edit the page with the form and edit the Form function properties to open the Form Builder.
- On the “Submit Actions” tab, select the option “Send data in an email”. More fields will become available.
- Fill out the fields:
- From: the sender’s email address
- To: the recipient’s email address
- Subject: [optional] the subject of the email. If not specified, the form’s title will be used instead.
- Encrypt email with password: [optional] the password to use to unpack the encrypted ZIP file with submitted data (see “Encrypting submitted data”). If not specified, the submitted data will be sent unencrypted in the message body.
- Click “OK”.
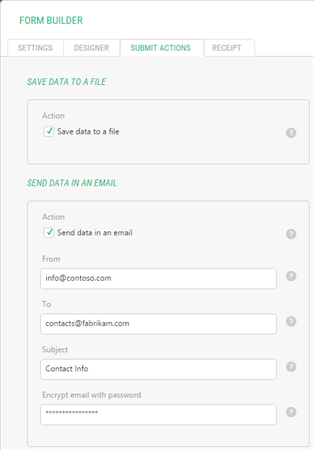
Figure 29: Setting up data submission by email
When the user submits the form, you’ll get the email with the data at the address specified in the “To” field above.
If you keep the Encrypt email with password field blank, you will receive the submitted data by email as a list of filed values in the message body and attachments for all the files uploaded via the form.
If you need your submitted data encrypted, specify the password in the Encrypt email with password field. In this case, the submitted data will be saved in an HTML file and both this HTML file and uploaded files if any will be encrypted in a ZIP file.
You will receive this encrypted zip file as an attachment. To view the thus submitted data and files, you’ll have to enter the password to unzip the attached file.