 Event Calendar
Created by Orckestra
Event Calendar User Guide
- Introduction
- Adding the Event Calendar to a Website
- Creating Events
- Showing Event Teasers
- Creating Locations
- Creating Signup Configurations
- Customizing Email Notifications
- Customizing Signup Forms
- Test Your Knowledge
Introduction
If you conduct online events such as webinars, you need to announce about their dates and allows people who want to participate in to sign up for them. Offline events may also require similar management on your website.
With the Event Calendar add-on installed on your website you to create various events such as meetings or webinars, list them on a web page and have visitors sign up for these events without leaving the page.
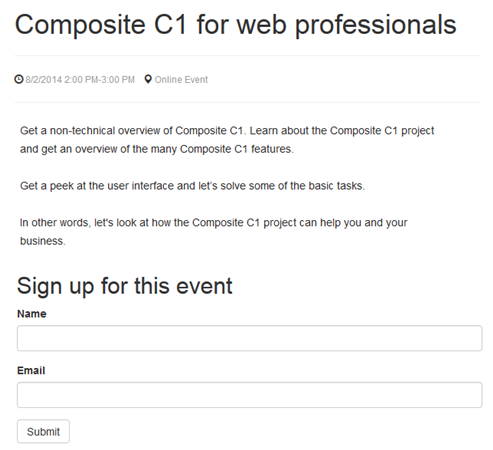
Figure 1: An event on a website
Each event includes its description, schedule and location.
It also provides a link to a signup form and you can manage the signup deadlines and the number of participants. Participants can be notified of their changed signup statuses via customizable email messages: signed up, queued, or canceled. To gather specific information about the participants, you can use your own signup forms.
If a person signs up for the event where all the seats were used up, he or she will be automatically add to the queue. And if a seat becomes available, this person will be automatically signed up and notified thereof.
This guide is mostly intended for editors who will create events and publish them on a website.
As an editor, you will primarily work within the Content perspective, creating events as well as doing some advanced tasks such as creating locations, signup configurations and customizing email notification messages.
To install the add-on, you will need permissions to install add-ons in the System perspective as well as edit the website’s configuration (web.config).
To customize sign up forms, you will need permissions to create and edit data types in the Data perspective.
To get started with the Event Calendar add-on, you are supposed to take a number of steps.
Getting Started | ||
Step | Activity | Chapter or section |
1 | Prepare the website | |
2 | Add the event calendar to the website | |
3 | Create events | |
4 | Show event teasers | |
5 | Create locations | |
6 | Create signup configurations | |
7 | Customize email notifications | |
8 | Customize signup forms | |
The following is the list of terms and their definitions used throughout this guide.
Terms and Definitions | |
Term | Definition |
Email notification | An email message sent to a participant to notify of his or her changed signup status. Sent when a participant signs up or is signed up (if earlier queued) for an event, is added to the queue, or cancels his or her participation. |
Event | A gathering of people at an arranged place and time in order to discuss or engage in some common interest, most commonly based upon industry, profession, and fandom. |
Location | The place of an event. Can be both online (identified by an URL) and offline (identified by an address). |
Participant | A person who has signed up for an event. |
Signup configuration | A configuration used when a person signs up for an event, which includes, email addresses of the sender, email notification messages, signup forms etc. |
Signup form | A form displayed on a page when a user signs up for an event. |
Before you install and use the Event Calendar add-on, please make sure that you have:
- Configured the email host,
- Installed the Forms Renderer add-on
The Event Calendar add-on requires configured email host to send email notifications on various signup-related activities.
Please see “Email Host Setup” for more information about email host setup options.
It uses the Forms Renderer add-on to create signup forms on a website.
Please see “Forms Renderer” for more information about installing and using the Forms Renderer add-on.
You install the Event Calendar add-on from the CMS Console as any other CMS add-on.
Please see “Packages” for more information about installing CMS add-ons.


